Setting up virtual environments can be a headache the first time through, but it’s particularly frustrating for Windows, for which there is significantly less documentation. Below you will learn how to not only set up basic virtual environments on Windows, but to do so with multiple different versions of python on the same computer. Along the way, there will be instructions on how to edit your Path, as well as set up aliases (name shortcuts) to make opening up our different versions of python easier. If you’re using PyCharm, there’s a handy built in virtual environment creation system, so you can skip to the instructions at the end of this article. If you’ve made it to this page I’m assuming you already know what a virtual environment is and the many reasons why you’d want to use one, but if not, Real Python’s virtual environment primer is a great place to start.
Basic Set-up
Step 1: Install each version of python you’ll need (separately). If you haven’t already installed each version of python that you’d like to be made available for virtual environments, you need to download/install each and every version separately. So, the good news is, you can have every single version of python available, the bad news is, it’s going to take up a [relative] lot of space. In my case, I needed a “downgraded” version 3.4.4, which is the latest compatible version with MySQL (at the time of writing).
- Note: If you don’t see a .exe or .msi installer for the version of python you’re trying to install, make sure that version isn’t only being offered in “source code form.” After a certain amount of time after new versions are released, security updates are added, but no new binary installers are created (hence why I went for 3.4.4 when 3.4.6 is available).
Step 2: If not done during install, add each python version to Path.
- In your Windows search bar, type either “advanced system settings” or “environment variables” and click the top result for either (they will both bring you to the same window).
- Click the “Environment Variables…” button, and a window will pop up.
- The window will have a section called “System variables,” under which there will be an entry for “Path.” Select and edit Path.
- If you’re on Windows 10, you will see a table with one entry per row, but in earlier versions of Windows you will see a single scrolling text box with entries separated by semicolons. For Windows 10, click “New” and type the full path to your python installs(s) (for example: C:\python34\ ). For earlier versions, the same text will be added at the end of the text box after a semicolon (for example: stuff_thats_already_there;C:\python34\ ).
- Click OK on all three windows to saved your changes.
Step 3: Set up aliases. Open Windows Powershell as administrator and:
- Type Test-Path $profile and press enter.
- If False you need to create a profile by typing New-item -type file -force $profile and pressing enter, but if true you can continue to step 3.
- Go to you PowerShell Directory. Step 2 will show the path to the location. For me its Users\zax\Documents\WindowsPowerShell.
- Open your profile by either double clicking the file in the path above, or by typing the following in PowerShell: Notepad .\Microsoft.PowerShell_profile.ps1
- In the open file in Notepad you can add your aliases. For example, I will add: Set-Alias python34 'C:\Python34\python.exe' .
- Save and close the file.
- Now to activate the aliases in this file you need to set the execution policy to allow this to be activate each time you open PowerShell. To do so:
- Type Set-ExecutionPolicy -Scope CurrentUser and press enter.
- You’ll see a prompt of “ExecutionPolicy: ”. Type Unrestricted and press enter.
- Confirm by entering Y and press enter again.
- Restart PowerShell (again, as Administrator).
Step 4: Install virtualenv. With Windows Powershell still open as administrator, we can now install virtualenv using pip install virtualenv.
Step 5: Create your virtual environment(s). To create your virtual environment, type python -m venv directory_name , where directory_name is whatever directory name (or file path) you want to use. If you want to manually select the version of python installed in the virtual environment (i.e. use one besides the default) you instead want to type virtualenv -p c:\python34\python.exe directory_name , swapping out the path with the targeted python version. You can either use an existing directory or the above command will create one for you.
Step 6: Navigate your new virtual environment(s). To switch to your new virtualenv, type directory_name\Scripts\activate.ps1 . You may get an error suggesting you type “.\” in front of that instruction – if so, write the instruction above with the .\ in front. Note that on older/legacy systems you may alternatively need to use activate.bat. To exit your virtualenv you can simply type Deactivate .
Using virtualenvwrapper-win
virtualenvwrapper-win helps you manage your virtual environments by 1) organizing them all in one location, 2) providing simple create/delete/copy methods, and 3) making switching environments easier. If you would prefer to use this added tool, first install the module via PowerShell and pip using pip install virtualenvwrapper-win and then replace steps 5 and 6 above with the steps below:
New Step 5: Create your virtual environment(s). To create your virtual environment, type mkvirtualenv directory_name , where directory_name is whatever directory name (or file path) you want to use. If you want to manually select the version of python installed in the virtual environment (i.e. use one besides the default) you instead want to type mkvirtualenv -p c:\python34\python.exe directory_name , swapping out the path with the targeted python version. The default location for the new environments is C:\Users\username\Envs , but this can be manually changed by [optionally] defining the WORKON_HOME and PROJECT_HOME environment variables by following the answer on this stackoverflow page.
New Step 6: Navigate your new virtual environment(s). To switch to your new virtualenv, type workon directory_name . To exit your virtual environment you can simply type deactivate . To delete a virtual environment you can type rmvirtualenv directory_name -r . For a more complete list of commands, check out the official documentation.
Using PyCharm
So now that you’ve potentially spent a lot of time reading the instructions above/testing it out for yourself, you can throw it all away, because PyCharm gives you a handy tool to do it visually right in the IDE. These instructions are copied straight from their documentation:
- Open the Settings/Preferences dialog box (Ctrl+Alt+S), and then open the Project Interpreters page.
- Click
 next to the Project Interpreter field, and choose the option Create VirtualEnv.
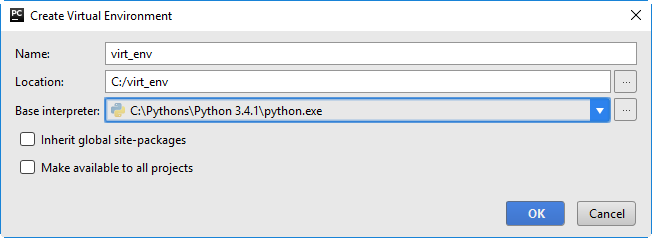
Create Virtual Environment dialog box opens. - In the Create Virtual Environment dialog box, do the following:
- In the Name field, type the name of the new virtual environment, or accept the suggested default name.
- In the Location field, specify the target directory, where the new virtual environment will be created, or accept the suggested default location.
- From Base interpreter drop-down list, select one of the configured Python interpreters, which will be used as the base for the new virtual environment. If the desired base interpreter is missing in the drop-down list, you can locate it manually by clicking
 .
. - If you want the site-packages of the base interpreter to be visible from the virtual environment, select the check box Inherit global site-packages. If you leave this check box cleared, the new virtual environment will be completely isolated.
- You can make this virtual environment available to all projects, by selecting the check box Make available to all projects.In the Create Virtual Environment dialog box, do the following:
- Click OK to apply changes and close the dialog box.

Other Alternatives
- Docker (I’ve never tried this myself, but I hear it’s much easier/less intimidating than you might think).
- Using an entire virtual machine (likely more resource heavy than needed/desired).
Please drop me a comment below with any questions or comments.


