This is an installation guide for Ubuntu 16.04 on a second hard drive in a Gigabyte Aero 14 Laptop (1st generation, which has two drive slots), where the first drive has Windows 10 installed. If you are looking to dual boot from a single drive, there are many guides you can google and substitute for the partitioning step (step 4) below. The rest of this guide, which discusses hardware/driver issues specific to the Gigabyte Aero 14 (though holds true for other laptops) will still be relevant to you.
- Download Ubuntu
- Create a Ubuntu bootable USD stick, on Windows, using Rufus
- Plug USB drive in, boot into BIOS (UEFI), and change boot order. Any computer newer than late-2010, early-2011 will use UEFI instead of BIOS, though both are casually referred to as “BIOS.” Once you’ve inserted the flash drive into the laptop, you will need to change the boot order to make sure the flash drive is being read first. To do this, reboot and press F2 to enter the BIOS (this will be on the black screen that says Gigabyte, before Windows loads). From this point, you will only be able to use your keyboard (you will just need arrow keys and the enter key) due to a trackpad issue specific to the Gigabyte Aero that we will correct later. To change the boot order, arrow over to the second to last tab, then arrow down to the first drive on the list. Press enter to open the options, then arrow to the flash drive (potentially just listed as UEFI device) and press enter to select. Then do the same to make the new drive second in the chain, followed by the Windows drive as the third selection. Now arrow over to the last tab at the top and save and exit. Upon reboot, you should be given options to either preview or install Ubuntu. I had no issues, but should difficulties arise during this step, re-enter BIOS (restart, press F2) and change the “Legacy mode” setting to “on” and/or turn “Secure boot” off.
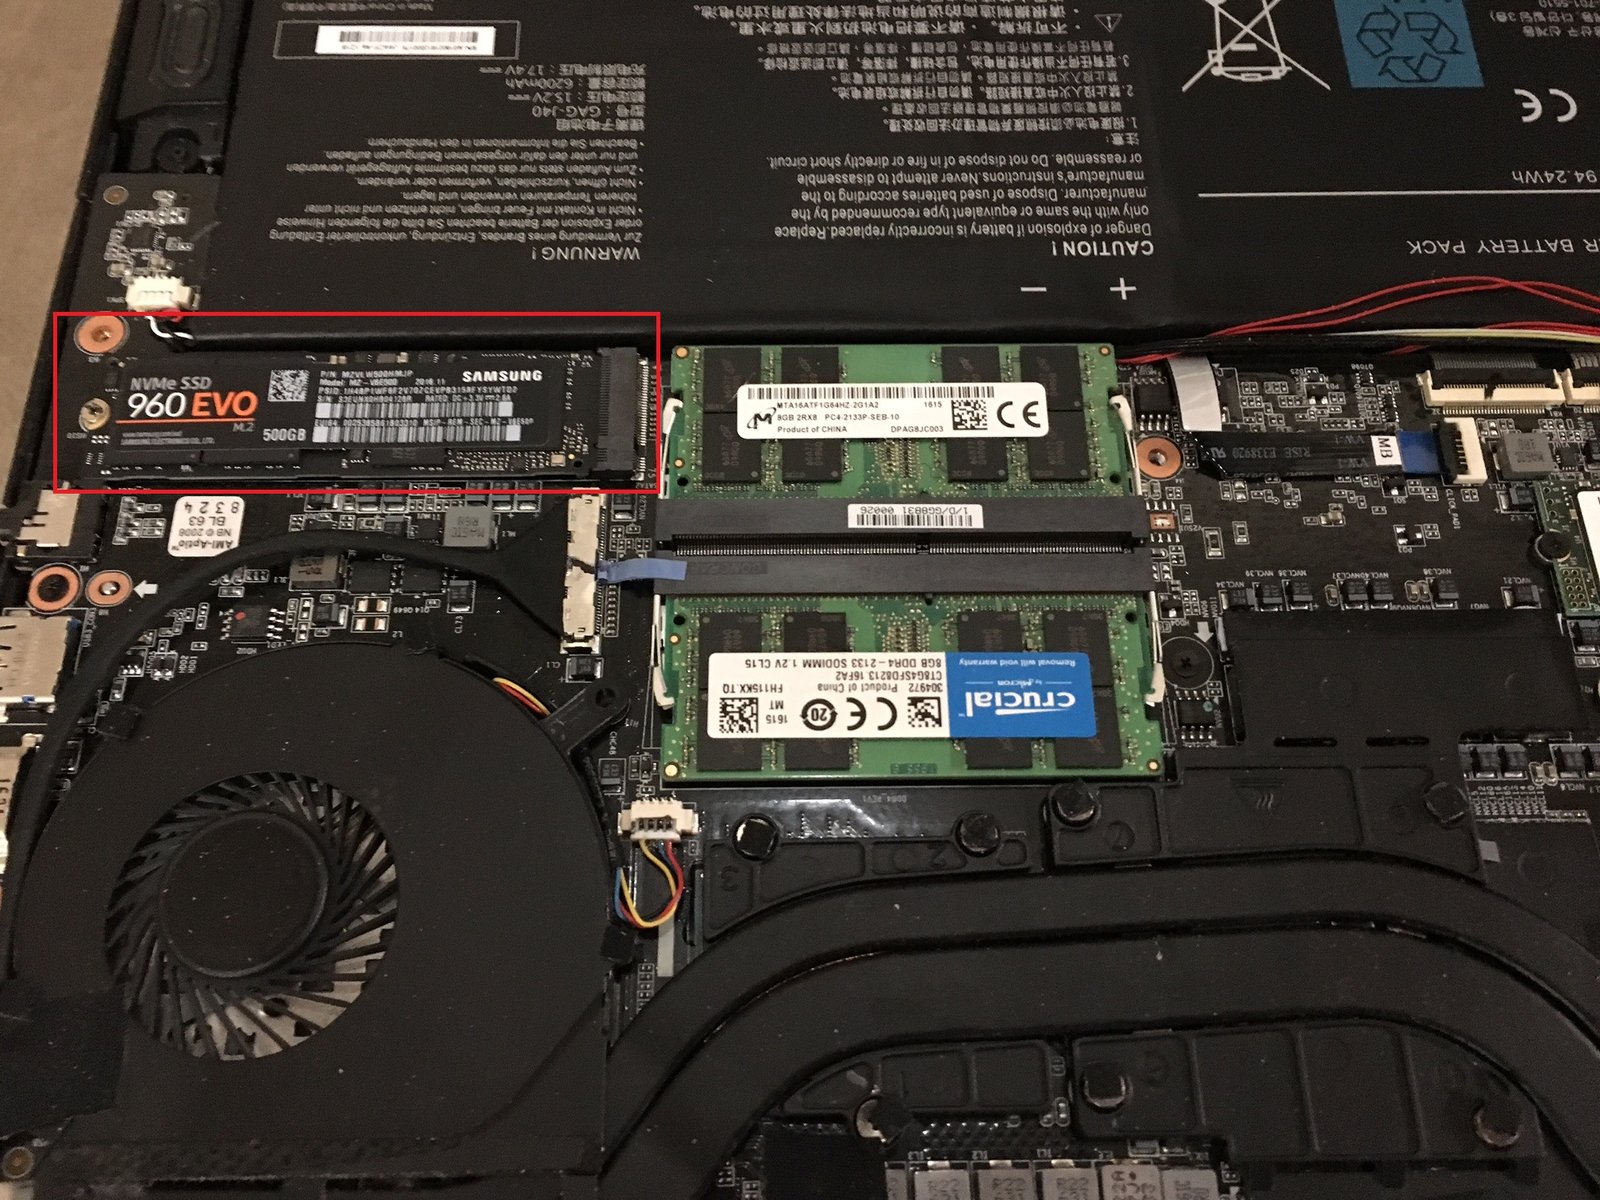
- Install Ubuntu on the second drive (partitioning). Select either the trial or install modes when given the prompt. Note: At this point you can continue to use the keyboard (space will tick/untick check boxes), or plug in a mouse (trackpad still not fixed yet). When it asks how to install, you MUST choose the manual install option, which shows up as “Something else” at the bottom of the install screen. Partitions then need to be made for swap, “/” (root), “/home”, and boot, though there are more optional partitions (see Ubuntu documentation here). Order of the partitions does not seem to matter for SSDs, but it is likely best to have the boot partition first on HDDs for physical distance from start (Source 1, Source 2). Make sure you select the new SSD (named NVMe1 if you’re using a Samsung 960 EVO, like me) or you might overwrite your Windows drive!
- swap should be at least the amount of RAM the computer has, but no more than double. SwapFAQ has a table with rough estimates by amount of RAM. This is important to allow for hibernation (need to “swap” RAM into swap on hibernate). When you choose an automatic install, Ubuntu makes an 18.64GB partition for 16GB of RAM.
- root is where the operating system, applications, and everything besides “files” go. This must be at least 8GB for Ubuntu, is recommended to be at least 15GB, and realistically should be at least 50GB. After accounting for swap, boot, and home, this should include all remaining space. On a 500GB drive, this is ~380GB for me.
- home is where personal files go, and is important because it protects files in case the operating system needs to be reinstalled (through upgrades of stable Linux distros would still be fine without it). Size this for as much file (music, video, etc.) space as needed. I used 100GB, as I have a home media server for larger back-ups.
- boot. Ubuntu has an EFI System Partition (ESP) option by default, so no need to manually select mount point. Generally it would be /boot/efi (no longer /boot). Recommended to be 100-250MB, but some recommend 512MB or even 1GB. I use ~512MB to be safe.
- Secure Boot. Issue with Windows 8+ and UEFI. Need a signed certificate (which Ubuntu has). For most other Linux distros, will need to update BIOS setting, usually under security. Look up particulars if you need this. Secure boot must be disabled for some third-party drivers to work, so you should do this/create a password for it during installation. This may add a brief, black start-up screen after BIOS, but before the Grub2 bootloader (see next step) once we’re all done (depends on how exactly you follow the driver installation steps in Part II of this guide).
- Finish installing Ubuntu and reboot.
- Grub2 bootloader should now allow you to select your operating system on start-up. Your options will be Ubuntu and the Windows bootloader. This screen, while ugly, can later be customized. You can either make changes manually, via file management in the GUI/a command, or via Grub-Customizer (a graphical tool).
- Update drivers. You should now be booted into Ubuntu, but the trackpad still isn’t working! Time to finally fix it. I was luck to find this guide (How to activate Elan touchpad on Ubuntu 16.04 and Gigabyte Aero 14), so I had to do no fiddling at all. For convenience and to tweak the editing tool selection, see my instructions below, but all credit to the writer of that post.
- Edit your GRUB file by opening terminal (ctrl + alt + t) and type:and then press enter.1sudo gedit /etc/default/grub
- I use gedit because it’s the default text editor in GNOME, and pretty easy to use.
- Add this line to the end of the file:1GRUB_CMDLINE_LINUX_DEFAULT="i8042.kbdreset=1"
- If using gedit, press ctrl + s to save, then ctrl + q to exit
- Update grub:and then press enter1sudo update-grub
- Reboot:and then press enter1sudo reboot
- Edit your GRUB file by opening terminal (ctrl + alt + t) and type:
- See Part II of this guide to do the hard part: configure the rest of the drivers. The most difficult thing to get to work, which can cause all kinds of random issues, is the graphic driver(s). This is particularly difficult for laptops with Nvidia Optimus/two graphics cards (usually one Intel and one NVidia, which have very different power consumption profiles and you want to be able to switch between to save battery), like the Gigabyte Aero 14.